I'm here to tell you how to do both things. First the easy one. To turn the screen off, effectively locking the machine, press Control + Shift + Eject on your Mac keyboard. The more difficult trick is locking the screen by starting the screen saver. Open up Keychain Access (hint: it's under Apps>Utilities) and choose Preferences from the menu bar. Now check the box for "Show keychain status in menu bar." You will now see a little lock shaped icon in the menu bar that allows you to lock the screen.
Showing posts with label Apple. Show all posts
10.24.2013
How to lock the screen in OSX
From day one of Mac ownership, one glaring omission has really bothered me. There's no obvious way to initiate the screen saver or turn off the screen in order to lock the machine. Locking the screen is a modern must-do in any environment. Every other OS places this option in plain sight making it impossible to overlook. With OSX, both options are obscurely hidden enough that no casual user would ever find them without Googling or mashing random key combinations for half an hour.
I'm here to tell you how to do both things. First the easy one. To turn the screen off, effectively locking the machine, press Control + Shift + Eject on your Mac keyboard. The more difficult trick is locking the screen by starting the screen saver. Open up Keychain Access (hint: it's under Apps>Utilities) and choose Preferences from the menu bar. Now check the box for "Show keychain status in menu bar." You will now see a little lock shaped icon in the menu bar that allows you to lock the screen.
10.23.2013
OSX Mavericks
It's about time... OSX Mavericks addresses some pretty serious issues I've had with my Mac since day one. Why these things took so long to be included in OSX is beyond me. The two new features I'm interested in are the improved handling of dual monitors and the battery graphing feature in Activity Monitor.
The ability to hide the unnecessary GUI clutter with full screen app is pretty nifty indeed, but I never used it. In the past two versions of OSX, full screening an app with dual monitors caused the app to take over one monitor (expected) and the OS to render a worthless gray texture on the other (WTF). Full screening an app now leaves the other monitor free to display other programs, the reason why I bought the second monitor to begin with. Also, the menu bar is now displayed on both monitors instead of only the primary monitor.
The second irksome issue Apple addressed was that of battery time tracking. I can see how long my phone has been on battery, so why couldn't I do this on my Mac? Now Activity Monitor includes a graph of the machine's battery charge over time, so I can see how long my battery has actually been running my machine, instead of just guessing. This pleases me in a very nerdy control freak sort of way. I'm sure there are others out there that will appreciate this new feature.
There's not a whole lot to lose by upgrading to Mavericks; hell, it's free, and it runs on machines made back in 2007. It's nice to get a free upgrade every once in a while, especially after having to deal with Mountain Lion for the last year.
9.20.2013
Setting up CenturyLink DSL with your own equipment
When I signed up for internet service for my apartment on Monday, I opted out of equipment rental. I wasn't at all interested in paying $7 a month extra for some modem/router/wifi combo POS. Instead I needed to find a DSL modem that could handle PPPOE, and a decent WiFi router.
I settled on a Netgear modem / router combo, which I disabled the routing features on, and an Apple Airport Express. Surprisingly, the AE supports PPPOE, further simplifying my configuration.
I moved into a new house across town and got my internet hooked up today. I hadn't messed with the modem for a while and I had forgotten how to configure it. Naturally, I googled "centurylink apple airport" and found my own guide. And the process still works almost two years later. Hooray for writing documentation!
DSL Modem settings
http://www.speedguide.net/articles/adsl-vpi-vci-and-encapsulation-settings-2786
In case the first link ever goes dead:
http://web.archive.org/web/*/http://www.speedguide.net/articles/adsl-vpi-vci-and-encapsulation-settings-2786
I settled on a Netgear modem / router combo, which I disabled the routing features on, and an Apple Airport Express. Surprisingly, the AE supports PPPOE, further simplifying my configuration.
1.
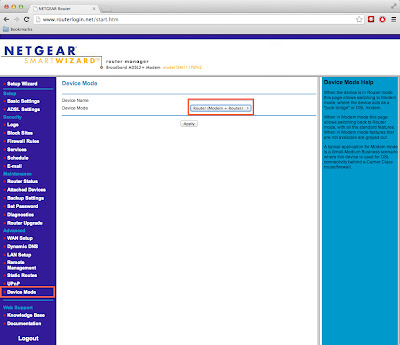
Configure the modem. In this case, we want the modem to do only the
most basic task, bridging the company to our router. To accomplish
this, the modem will need to be configured to bridged mode. Connect
your computer and the modem via an ethernet cable. Open a browser
and navigate to www.routerlogin.net.
This will bring you to the modem's setup page. The default username
and password is admin / password. Go to the Device Mode page and
change the device mode to modem only, then click apply and wait a
minute.
Next go to the ADSL setup page and change the VPI number to
8 instead of 0. Click apply there and you're done. Edit August 27, 2015: This guide should apply to other DSL carriers though. Check this page link
to figure out your VCI and VPI settings for your provider.
2. It's time to setup the Airport Express. This step can be performed
from a Mac or Windows machine using the Airport utility. Plug the
ethernet cable from your modem into the “O” port on the back of
the AE. Open Airport utility and choose the new AE to configure.
Name your new AE and give it a password.
If the modem was configured properly, your next screen should look like this.
Use
the username and password provided by your ISP to log in here. Click next one more time and you're done. You now have a functional WiFi network and a connection to the internet. Feel free to adjust the AE settings. I would recommend changing the AE's network or admin password, as it uses the same password for configuring the device and giving access to the WiFi network. You don't want your guests messing around with your settings.If the modem was configured properly, your next screen should look like this.
Edit August 27, 2015
I moved into a new house across town and got my internet hooked up today. I hadn't messed with the modem for a while and I had forgotten how to configure it. Naturally, I googled "centurylink apple airport" and found my own guide. And the process still works almost two years later. Hooray for writing documentation!
DSL Modem settings
http://www.speedguide.net/articles/adsl-vpi-vci-and-encapsulation-settings-2786
In case the first link ever goes dead:
http://web.archive.org/web/*/http://www.speedguide.net/articles/adsl-vpi-vci-and-encapsulation-settings-2786
7.28.2012
More tabs? No problem.
No good tech guy would argue that 4 gigs of RAM is sufficient for a modern system. Why Apple even sells a machine with the option of 4 gigs is beyond me. The good thing about the low SKU machine is that adding RAM yourself after the fact is ridiculously easy and is so much cheaper than buying it from Apple. The 2012 Macbook Pro (non-retina) that I purchased this July came to me with 4 gigs, and is only officially, according to Apple, upgradeable to 8 gigs. Unofficially, you can put 16 gigs of RAM in the machine, the same amount the Retina can be configured to hold.
Corsair's Vengeance DDR3 1600 RAM will work just fine and cost you the same as 8 gigs from Apple. Unibody Macbook Pros are so easy take apart and install RAM into. I did it in my pajamas in 10 minutes before I was even "awake". Just be sure the machine is off fully, not just idling in standby mode.
With the default 4 gigs of RAM, I experienced some serious slowdowns when I had G+ hangout running along with another 20~ tabs, Apple mail, and a few terminals. That is a very average system load for what I do and my brand new machine was choking on it. After changing to 16 gigs of RAM, I was able to open up 166 tabs in Chrome, Apple mail, and type up this article with no problems. And there is still memory to spare.
Here are a few shots of the Macbook Pro that I took shortly after getting it. I apologize for the crappiness of the photography; I only had my phone to take pictures with.
2.22.2012
Chainload chimera with grub
If you want to dual boot your hackintosh with Linux using grub to select the operating systems, add the following lines to the 40_custom file and rebuild the grub menu.
menuentry "Mac OS 10.7 loader"{
set root=(hd1)
chainloader +1
}
The "40_custom file is located at "/etc/grub.d" . To update the grub menu, run "update-grub" from terminal. Once you run the update script, you will want to remove or comment out the other Mac OS entries that grub finds, as these will not work. (OS X needs chimera to boot from a normal BIOS.)
This scenario works only if you have Linux and grub on one hard drive and Mac OS on another. Substitute (hd1) for whatever hard drive you are running Mac OS from.
menuentry "Mac OS 10.7 loader"{
set root=(hd1)
chainloader +1
}
The "40_custom file is located at "/etc/grub.d" . To update the grub menu, run "update-grub" from terminal. Once you run the update script, you will want to remove or comment out the other Mac OS entries that grub finds, as these will not work. (OS X needs chimera to boot from a normal BIOS.)
This scenario works only if you have Linux and grub on one hard drive and Mac OS on another. Substitute (hd1) for whatever hard drive you are running Mac OS from.
2.17.2012
Mail not sending on iPhone? Check SMTP settings
Today I fixed a coworker's iPhone which could not send emails from both of his email accounts on his phone. I discovered that the problem stemmed from the SMTP settings configuration, which did not enable authentication by default. To correct the problem you will need to enable authentication under the SMTP settings pane; most people will be fine choosing password authentication.

The final pane is where you need to be in order to change the SMTP settings. The server port will vary depending on your service provider. Newer implementations will use port 587, some servers will use port 25, and yet others will use port 80. Not all mail services will support SSL, but I highly recommend using it if it works with you server.
One last thing to note: In my example, I use gmail. Setting up a gmail account using this method should not be necessary, as iOS implements gmail correctly and automatically configures the settings correctly.

The final pane is where you need to be in order to change the SMTP settings. The server port will vary depending on your service provider. Newer implementations will use port 587, some servers will use port 25, and yet others will use port 80. Not all mail services will support SSL, but I highly recommend using it if it works with you server.
One last thing to note: In my example, I use gmail. Setting up a gmail account using this method should not be necessary, as iOS implements gmail correctly and automatically configures the settings correctly.
2.10.2011
iPad Review
I always thought that I had a phobia to Apple products due to their incompatibility to most enterprise and professional programs on the market. I have especially criticized the iPad for being just a large iPod with no added functionality. But recently, I was looking for a portable system to take with me between my house and college. Someone suggested the iPad, and I laughed at the notion. However, I looked into it and decided I would go ahead and take the plunge. In no time, I had the iPad ordered.
12.20.2008
Apple iBook G4
I've always been a PC user. A few years ago a friend inroduced me to Linux, but I never really liked using it. Now the same friend loaned me an iBook G4. Its not particularly powerful, but it works just fine for everyday web browsing and email tasks. The Macintosh interface is very simple and easy to use. Sometimes I wish it had a right click button though. Having to press CRTL and click to bring up a context menu is somewhat annoying. Software installation is quite easy. Download the file, double click the file, and drag to the applications folder. The operating system itself appears to be quite stable as well. The hardware is also simple yet elegant. The bottom of the laptop is one solid piece except for the battery. There are no stickers, vents, or panels that clutter up the bottom. Overall the Macintosh platform is pretty nice. Its definately not a power user's platform. However if you are looking for a stable, easy to use computer, I would suggest a Mac. Just remember, that you will have to look for software that will work on the Mac if you want to do more than check email and browse the web.
Subscribe to:
Posts (Atom)