Pages

2.18.2014

I call BS...

A few weeks ago, I bought a pair of jeans from Sears at a local mall.  It has become common practice for retailers to email receipts to customers instead of printing four feet of paper.  Of course, in order to do this, they have to solicit your email address.  And when the cashier asked to my email address, I gave it to her.

In addition to receiving the receipt for my purchase, I was involuntarily signed up for spam.  Over a span of 11 days, I received 6 advertising emails from Sears.  The stupidest thing about the entire situation:  I unsubscribed after the second email.  Why do they keep sending me ads after I've told them I'm no longer interested?

A huge pile of shit
When I clicked the unsubscribe button on the website, I expected to see a message saying that I was unsubscribed and would no longer receive advertising emails.  Instead, Sears showed a popup saying that it would take 7 - 10 days to process my request.  If I weren't a computer science major, I might believe that.  In fact, any logical thinker could figure out that this is just a marketing tactic.

It's highly suspicious of them to quote "7-10 days" to unsubscribe, when it took them about 30 seconds to get me in the system in the first place.  Seriously, my phone was buzzing away with new emails before I reached my car.  I wonder, what about their system causes it to take 20,000 times longer to unsubscribe me for the list than it took to subscribe me in the first place?

Certainly, it's not a technical issue.  I don't know the exact workings of Sears email system, but it wouldn't be unreasonable to think that three or four SQL statements got me in the system.  Unsubscribing should be simpler: I'm thinking one SQL statement ought to drop me from the list.  The last time I checked, it didn't take 7 days to process a SQL command.  Unless they have to send a tech down to the data center to scrub my name off the hard drive with a Q-tip, this practice is inexcusable.

As I've deduced that there's not a technical factor at play here, the logical explanation is that the 7-10 day delay is simply a matter of policy.  This policy only serves one real purpose... to distribute more spam.  From the moment I click unsubscribe to when my name actually goes off the list is a window of opportunity to send me a few more emails.  Admittedly, this a great marketing tactic masquerading as a technical limitation.  It still doesn't make me hate spam any less though.  That four foot receipt might not be so bad after all.

2.08.2014

Making an endless list load smoothly in Android

In my latest Android app endeavor, I needed to create an endless list.  There's no built in class that does this, so I had to create something that would approximate one.  There are plenty of tutorials on the basic ideas behind endless lists, but none of them worked very well for my application.

My app is a viewer for interfacelift.com, which provides high quality wallpaper downloads.  The app displays a list of wallpapers in descending chronological order.  The user can continue scrolling indefinitely (until the site runs out of wallpapers).   The standard way of approaching the infinitely scrolling list tends to be glitchy when the next set of wallpapers loads.  I've come up with a simple solution to solve the glitchy-ness problem.

When the app loads a set of wallpapers, it adds them to an ArrayList, which is displayed by the ListView.  However, the list adapter doesn't know about the new wallpapers until it is explicitly told that the data set has changed with a call to notifyDataSetChanged().  When this happens, the list adapter is forced to update all of the views.  In my app's case, issuing a new view sets the ImageView's drawable to a placeholder, which is almost immediately replaced with the real image.  This causes the entire list to "jerk" when the existing images are updated.


Continue reading to see code solution.

11.11.2013

The quest for the perfect writing spot

Normally, I don't need any extra motivation to write an article here.  I enjoy writing techie articles that four people a month read.  Writing papers for English class is a bit different.  It's more challenging.  I have no aversion to being challenged, it just takes a bit more motivation to get going.  Today I set out leaving the comfort of my own apartment and find the perfect spot in Spokane to jump start my writing mojo.

As a coffee lover, it was only natural that I seek out a coffee shop to conduct my work.  I tossed my Macbook in my backpack and set foot toward the nearest bus stop.  My bus trip ended in downtown Spokane, near River Park square.  I didn't have any predetermined coffee destinations in mind, the only criteria was to avoid Starbucks.  I realize that these establishments are businesses, not temporary offices, and thus limited my stays to around an hour.

The first stop of the day: Thomas Hammer in downtown Spokane.  I ordered my favorite non-latte drink, the Fireball (no, it doesn't have Fireball whiskey in it).  This drink is essentially a mocha, with a shot of orange syrup in it.  It is weirdly delicious.  The barista even made latte art in the drink, but sadly I wasn't able to admire its beauty as she covered it with the lid immediately after pouring it, though the imprint of the art was visible through the lid for a few fleeting moments.  Aside from a few noisy patrons, the environment was fine for productivity.  I didn't need to squirm in the chair, as the seating was quite comfortable.  There were no power outlets to be found. Fortunately, my machine had enough charge to get me through an hour, after which I left to avoid overstaying my welcome.  Thomas Hammer had Wi-Fi, but it was password protected, so I used my Nexus 4 as a hotspot instead.

About three blocks away, I found the Brews Brothers coffee shop, a place with a friendly atmosphere and chatty customers.  The barista there seemed to know a lot of the customers by name, indicating that many of them were regulars, a good sign indeed.  This time I ordered a chai latte, and that's all I have to say about that.  This time, I was able to situate within reach of a power outlet.  Again, Wi-Fi was password protected, so I whipped out my phone once again.  The atmosphere here was much more conducive to writing.  There space was large enough to dissipate the individual conversations and native noises of a coffee shop.

Finally, after wandering the blocks for a few minutes after lunch, I located Atticus.  This joint was by far the busiest of three I had visited today, and it was 2 PM.  Admittedly, much of the traffic in the store was on the gift shop side, but there was still about 20 people occupying tables and enjoying coffee.  I ordered a plain latte this time, which was the cheapest drink I bought at $2.99 after tax.  Atticus expects a certain volume of sit down customers, serving drinks in ceramic mugs if you choose to stay.  Props to them for saving the environment and saving money on cups.  Now that I had my latte, I needed a place to sit.  All of the individual tables were taken, leaving me to take a chair at one of the large group tables.  These tables are an open invitation for group activities, as every time I've been to this establishment, there were groups of teenagers doing homework at the tables.  Atticus even posts signs on the tables to the tune of "We are a business, not a study hall or an office. Please don't hog the seating."  Despite the bustling atmosphere, I was able to get some work done here.  And the latte was decent.

It should be noted that none of these places had open Wi-fi, though it was free at all of them.  It seems that coffee houses are either WPA protecting their Wi-Fi to stop people from squatting or give patrons better security.  If I owned a coffee shop, I'd probably do the same.

Of the three shops I sampled today, I would be most likely to return to Brews Brother to get some work done.   Lots of seating options and a large(ish) room made this place desirable for getting work done.  Naturally, I'd order a drink that wasn't a pre-made chai tea, as pre-made chai is just too sweet for my taste.

10.26.2013

Java Comparator vs Comparable

The Comparable and Comparator interface both let objects in Java be sorted, but go about it in different ways. Let's say that you are a sort method, and I pass you a collection of beer. Using comparable (built into the beer) you can sort the beer by name. Duh, it's on the bottle.

But what if I ask you to sort my beer by temperature, coldest first? I would need to provide you with a tool (a comparator) , in this case, an infrared temperature sensor in order for you to accomplish the task. Using the temperature sensor I've provided you, it's now possible to sort the beer by temperature.

Similarly, if I asked you to sort beer by alcohol content, I would need to give you a hydrometer to check the specific gravity. This is akin to yet another comparator. Notice that none of these comparators are built into the beer itself.

Have a look at an example I've whipped up. Download the files from drive and compile them using javac *.java on your machine. Then run the one called BeerFridge.java using the command java BeerFridge

10.24.2013

How to lock the screen in OSX

From day one of Mac ownership, one glaring omission has really bothered me.   There's no obvious way to initiate the screen saver or turn off the screen in order to lock the machine.  Locking the screen is a modern must-do in any environment.  Every other OS places this option in plain sight making it impossible to overlook.  With OSX, both options are obscurely hidden enough that no casual user would ever find them without Googling or mashing random key combinations for half an hour.

I'm here to tell you how to do both things.  First the easy one. To turn the screen off, effectively locking the machine, press Control + Shift + Eject on your Mac keyboard.  The more difficult trick is locking the screen by starting the screen saver.  Open up Keychain Access (hint: it's under Apps>Utilities) and choose Preferences from the menu bar.  Now check the box for "Show keychain status in menu bar."  You will now see a little lock shaped icon in the menu bar that allows you to lock the screen.


10.23.2013

OSX Mavericks

It's about time... OSX Mavericks addresses some pretty serious issues I've had with my Mac since day one.  Why these things took so long to be included in OSX is beyond me.  The two new features I'm interested in are the improved handling of dual monitors and the battery graphing feature in Activity Monitor.  

The ability to hide the unnecessary GUI clutter with full screen app is pretty nifty indeed, but I never used it. In the past two versions of OSX, full screening an app with dual monitors caused the app to take over one monitor (expected) and the OS to render a worthless gray texture on the other (WTF).  Full screening an app now leaves the other monitor free to display other programs, the reason why I bought the second monitor to begin with.  Also, the menu bar is now displayed on both monitors instead of only the primary monitor. 

The second irksome issue Apple addressed was that of battery time tracking.  I can see how long my phone has been on battery, so why couldn't I do this on my Mac?   Now Activity Monitor includes a graph of the machine's battery charge over time, so I can see how long my battery has actually been running my machine, instead of just guessing. This pleases me in a very nerdy control freak sort of way. I'm sure there are others out there that will appreciate this new feature.  

There's not a whole lot to lose by upgrading to Mavericks; hell, it's free, and it runs on machines made back in 2007.  It's nice to get a free upgrade every once in a while, especially after having to deal with Mountain Lion for the last year.  


10.06.2013

Make Eclipse Create Zips of Your Source Automatically

For all of my university programming classes, I have to turn in a zip file with my source code.  It isn't a big deal to create a zip file when I'm done, but occasionally I submit multiple iterations before I'm finally satisfied.  In those instances, creating zip files manually through finder is tedious.

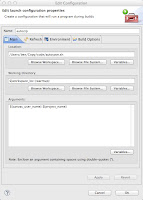
To solve this problem, I created a very simple shell script and integrated it into Eclipse.  Eclipse will run the script automatically every time any files in the project are saved or created.  This way, my zip file always contains the most up-to-date source files.

To get started, you'll need to create a shell script by copying and pasting the following lines into an empty file, then save the file and make it executable using chmod 755 filename.

#! /bin/bash
#Prefix to prepend to dirname, used for naming the zip file
UNAME=$1
#get the name of the directory this is being run from
PROJECTNAME=$2
zip $UNAME$PROJECTNAME src/*.java

Once you've got the script saved in a safe place, open up your project in Eclipse.  (Note that I name my projects according to the assignment.)  Right click on your project in the Package Explorer pane and select Properties.  Choose the Builders link from the list on the left.  Click the New button on the right.  Select Program from the next window that appears.  Give your new configuration a name.  Click Browse Filesystem and find your script for the first blank.  Then Browse Workspace and pick your project for the "Working Directory" blank.  At the bottom: Variables >> Edit Variables >> New.  Name your variable something descriptive, like canvas_user_name, and provide a value, like daschelb. Then click OK >> OK, then select your new variable and click OK once more.  Click variables again, only this time choose the one named project_name.  Make sure there is a space between the variables in the "Arguments" area.  


Next click the Refresh tab and check the box for Refresh resources upon completion and tick the radio button for The project containing the selected resources. Forget about the Refresh tab.  Those settings seem to cause an infinite loop of recompiling. 


Finally click the Build Options tab and select Launch in background and During auto builds.


That's it. Eclipse will now start generating a zip file for you every time it compiles your code. (BTW, the script places the zip in the root of your project folder.)

9.20.2013

Setting up CenturyLink DSL with your own equipment

When I signed up for internet service for my apartment on Monday, I opted out of equipment rental.  I wasn't at all interested in paying $7 a month extra for some modem/router/wifi combo POS.  Instead I needed to find a DSL modem that could handle PPPOE, and a decent WiFi router.

I settled on a Netgear modem / router combo, which I disabled the routing features on, and an Apple Airport Express.  Surprisingly, the AE supports PPPOE, further simplifying my configuration.


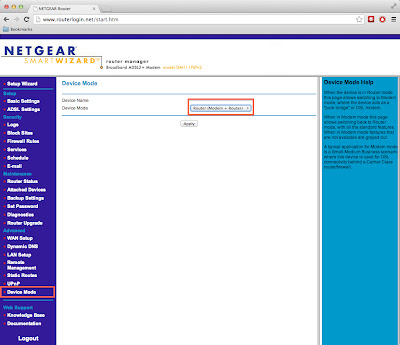
1. Configure the modem. In this case, we want the modem to do only the most basic task, bridging the company to our router. To accomplish this, the modem will need to be configured to bridged mode. Connect your computer and the modem via an ethernet cable. Open a browser and navigate to www.routerlogin.net. This will bring you to the modem's setup page. The default username and password is admin / password. Go to the Device Mode page and change the device mode to modem only, then click apply and wait a minute. 


Next go to the ADSL setup page and change the VPI number to 8 instead of 0. Click apply there and you're done. Edit August 27, 2015: This guide should apply to other DSL carriers though.  Check this page  link to figure out your VCI and VPI settings for your provider.


2. It's time to setup the Airport Express. This step can be performed from a Mac or Windows machine using the Airport utility. Plug the ethernet cable from your modem into the “O” port on the back of the AE. Open Airport utility and choose the new AE to configure. Name your new AE and give it a password.

 If the modem was configured properly, your next screen should look like this.

Use the username and password provided by your ISP to log in here. Click next one more time and you're done. You now have a functional WiFi network and a connection to the internet.  Feel free to adjust the AE settings.  I would recommend changing the AE's network or admin password, as it uses the same password for configuring the device and giving access to the WiFi network.  You don't want your guests messing around with your settings.


Edit August 27, 2015


I moved into a new house across town and got my internet hooked up today.  I hadn't messed with the modem for a while and I had forgotten how to configure it.   Naturally, I googled "centurylink apple airport" and found my own guide.  And the process still works almost two years later. Hooray for writing documentation!

DSL Modem settings
http://www.speedguide.net/articles/adsl-vpi-vci-and-encapsulation-settings-2786

In case the first link ever goes dead:
http://web.archive.org/web/*/http://www.speedguide.net/articles/adsl-vpi-vci-and-encapsulation-settings-2786


9.02.2013

Better Shopping List now on Google Code

In addition to hosting my Android app project on Github, I've also started a page on Google code for it.  Eventually, I'll spend some time and write the wiki pages there on how to download and compile the project, but for now it's an unlit alley at night.  

On another note, I've been able to add NFC functionality to the app.  At this point in time, it simply beams the entire list to the adjacent device.  I think NFC is really nifty, so I'll probably extend that functionality in the future.

8.25.2013

Beginning Android programming

This summer I decided to engage in some extracurricular coding; I bought an e-book on Android programming and began typing away.   I soon realized that I really had no idea  what it was that I was doing.  It's pretty difficult to actually understand the code you're writing if all you're doing is typing the sample code segments from the book.

I decided that I needed to venture away from the book and write an app of my own.  Additionally, I wanted to gain some experience with version control software, so I created a Github account to hold my project.  And thus Better Shopping List was born.

Over the past 10 days, I've brought a very basic list keeping app into existence with minimal copy/pasting from the internet.  As the project has progressed, I've been forced to consult the Android API many times in order to solved my problems.


6.15.2013

Setting up Ubuntu on an older iMac

What does one do with a Core 2 Duo iMac that only has one gig of RAM? OSX Lion requires at least 2 gigs of RAM, and older version of OSX are hard to come by, legally that is.  I decided that the best thing to do with an  (almost) junker machine was to install Ubuntu.

I acquired this Mac from a friend under the terms: "If you can fix it, you can keep it."  The machine needed a logic board replacement for starters, as it wouldn't boot.  I came across a replacement on eBay for the low price of $20.  Once I had that up and running, I grabbed my trusty OCZ Vertex 2 SSD from my desktop and slapped it in the Mac (Why not, I had it open anyway).

Read the install instructions after the break.

6.06.2013

WTF Microsoft!?

I'm down to the last few days of the quarter, so I decided to use my CS benefits and download Windows 7 from Dreamspark.  I may never use it, but hey it's a free copy of Winderp.

In order to download a the ISO, M$ makes you install their Secure Download Manager.  This pile of crap only runs on Winderp and OSX, so I couldn't use it on my Linux desktop.  I guess I can't blame them though; open source operating systems aren't secure and are mainly used by pirates.  So I ran the SDM on my Macbook pro instead.  It's nothing more than a browser display with no menu buttons.  The worst part:  it uses 70% of a CPU core while downloading!  WTF?  I guess that's what I get for trying to use an M$ software on a Mac.


In the process of writing this article, I got the following lovely window.


And to rub salt in the wound, I reopen the program to find the download is at 99% completed.  No problem, I just click resume.... And it crashes again.

Maybe I don't need Winderp after all.


4.17.2013

Coding Derp of the day

As I write more and more code in my CS classes, this type of post could become a regular thing.


This code actually works.

The function above simply asks the user if he/she would like to go again, used for whatever.  If the user answers yes or no, the function returns 1 or 0.  Otherwise it loops again until the user inputs yes or no.  The "for" loop capitalizes each character in the response so that the input string can be of any case.

Here's the derp I made.  I forgot to initialize "i" to 0 (line 57) each time the main loop runs, so if the user entered an invalid answer the first go around, "i" was incremented to 10 and never reset.  Any subsequent go-rounds would never enter the for loop to capitalize the input, therefore entering "yes" was not being considered as valid because "yes" is not the same as "YES"!

Anyway, I spent about 30 minutes debugging this one thinking it was some sort of input buffer issue with new line characters.  Hope that somebody else can learn from my mistake.

4.11.2013

Das keyboard modding

You can go anywhere and read somebody else's review of the Das Keyboard Ultimate.  I bought mine this week and I love it so far.  But the one irritating thing is the plastic on plastic banging sound when the keys bottom out.  I've never been a good touch typist, so I inevitably bang on the keys harder than I need to.  The solution to the obnoxious noise: O-rings under the key caps.

To do this project yourself, you'll need a few tools and some O-rings.

I recommend the following key cap puller tool: link
These o-rings also worked well for me: link

You should also grab a set of long nose pliers for removing the large keys from the stabilizers.

The process itself is fairly straight forward.  Spread the puller tool over a key cap and pull upward.  The larger keys will require you to use the pliers to pull outward on the stabilizer bar in order to remove the key.


Pitfalls to avoid:
  • Avoid removing all the caps at once.  Each row is slightly different.
  • Put the keys on the right way. The flat side of the key faces the back of the keyboard. (When you look at a key from the top down, once side is noticeably less slanted.
In case you do make the mistake, the keys are stamped on the backside with a row number and another number.  If you screwed this up like I did, here is a little diagram.

`1234567890-=    (No row number) tallest
qwertyuiop[]    (R3)
asdfghjkl;'    (R2)
zxcvbnm,./    (R1) shortest


The actual placement of the keys within the row does not seem to matter from what I can tell.

If you're wondering what is sounds like when you're all done, have a listen.  The first set is from the un-modded keyboard, the second part of the clip is from the keyboard after the O-rings have been installed.  Listen on soundcloud.  Sorry, I couldn't place the widget on this page, the soundcloud widget was causing Chrome to tweak out.


2.08.2013

Evo 3D stock ROM results

It has now been officially one week of using the HTC stock ROM on my EVO 3D.  Here is the TL;DR version in bullet points of my findings.

Pros

  • Excellent idle battery life -often lasted two days
  • SMS and MMS working
  • Calling works without drops
  • GPS / navigation works
  • Keyboard is acceptable once calibrated and tracing is enabled (Yes, the stock keyboard has trace gestures)
  • 3D camera works (Not that I care)
  • ROM is smooth overall
Cons
  • Battery life is drained quickly my doing anything on the phone (screen on)
  • Data speeds are slow ( more likely a VM issue)
  • GPS slow to lock on
  • Keyboard suggestions are usually wrong, typing on the keyboard is sucky
  • Sense is an ugly UI with overly detailed icons, which are all too similarly colored.

Under light loads, this ROM allowed
my EVO 3D to go over a day before
recharging. 
In more words, the stock ROM isn't all that bad.  Other than the fact that many of we power users are not fans of the Sense bloat, the stock ROM performed well enough to get me through the week.
Using the latest radio firmware version, the stock ROM had no problems sending or receiving texts or MMS.  As many of you may be aware, the original radio firmware often produced errors when sending text messages.  The signal indicator frequently jumped from full signal down to 1-2 bars and back however.  Other than slow, data speeds the signal fluctuations didn't seem to affect functionality of the phone.

A small but important issue that bothers me about the stock ROM, is that it holds certain preset associations for apps instead of asking the user each time.  For example, when I click a link in an email, it open the stock browser.  If I want to change this behavior, I navigate through the system settings menu and choose a different app to associate with URLs.  I want to be able to choose each time which browser I use.

The keyboard on the stock ROM out of the box is utterly useless.  It is totally uncalibrated so hit detection is off by an entire key.  I was continually pressing 'O' instead of 'I' or 'M' instead of 'N'.  Once calibrated however, the Sense keyboard is on par with other traditional android keyboards.  Enabling tracing makes the keyboard function much like Swype, except better in most cases.  Although I installed Swiftkey, my favorite keyboard, I was never irritated enough by the stock keyboard to need to use it.

While I hate the interface of the stock ROM, and it lacks power user customizations that I'm used to, I could continue to use it on a daily basis.  The stock ROM is reasonably smooth and gets me through the day with battery life to spare.  Stay tuned for my thoughts on CM10 next week.